
In today's digital age, the demand for high-quality, refurbished keyboards is on the rise. Whether you're a tech enthusiast, a professional refurbisher, or just someone curious about the process, understanding the key terminologies and techniques involved in keyboard refurbishment is essential. Here's a comprehensive guide to help you navigate this fascinating field.
1. EU Layout vs. US Layout
The EU layout is the primary keyboard layout used in Europe and many other parts of the world. It features one extra key compared to the US layout, allowing it to convert to any language without losing any symbols. On the other hand, the US layout is prevalent in the Americas and some parts of Europe, such as Holland, which prefers the US layout and language1.
2. Non-Backlit vs. Backlit Keyboards
Non-backlit keyboards are standard keyboards that do not light up in the dark. These were commonly used until recently. In contrast, backlit keyboards have lighting that shines through the surrounds of the keys and the lettering. When standard keyboard prints or stickers are applied, the light shining through the letters may be lost, but the backlight surrounding the keys remains visible1.
3. Standard Keyboard Print
A standard keyboard print typically involves using a UV printer to print over an existing keyboard. This method can make the keyboard look new or change its language. However, if the language is changed, the backlight behind the letters is lost, although the light around the keys is retained. This method is widely offered by keyboard printing services1.
4. Issues with Standard Keyboard Print
There are several challenges associated with standard keyboard printing:
- Language Change: When changing to a completely different language, small black bumps may appear where the old lettering was. This can be mitigated by aligning the new letters over the old ones or sanding down the keys, which adds extra time to the process.
- Backlit Keyboards: Printing over a backlit keyboard can result in the old letters being visible as blacked-out areas. This can be mitigated by filling the keys and letting them dry, which also adds time.
- Flat Surface Requirement: All keyboards or laptops need to lay flat for printing. For example, MacBooks require the lid to be removed for keyboard printing1.
5. True Backlit Keyboard Printing
True backlit keyboard printing involves changing the language while retaining the backlight on the letters. This requires lasers to remove the original keyboard, leaving a blank keyboard. The process can take up to 1 hour and 15 minutes per keyboard and is expensive. Different base coats of paint used by various factories can react differently to lasers, requiring adjustments in laser settings1.
6. SticKeys
SticKeys is a patent-pending solution that addresses many of the issues associated with standard keyboard printing. These stickers are slightly thicker, hiding bumps and dips, and can be applied without removing the laptop lid. True backlit SticKeys still require lasering the keyboards, but the process is faster and easier, taking about 15 minutes per keyboard1.
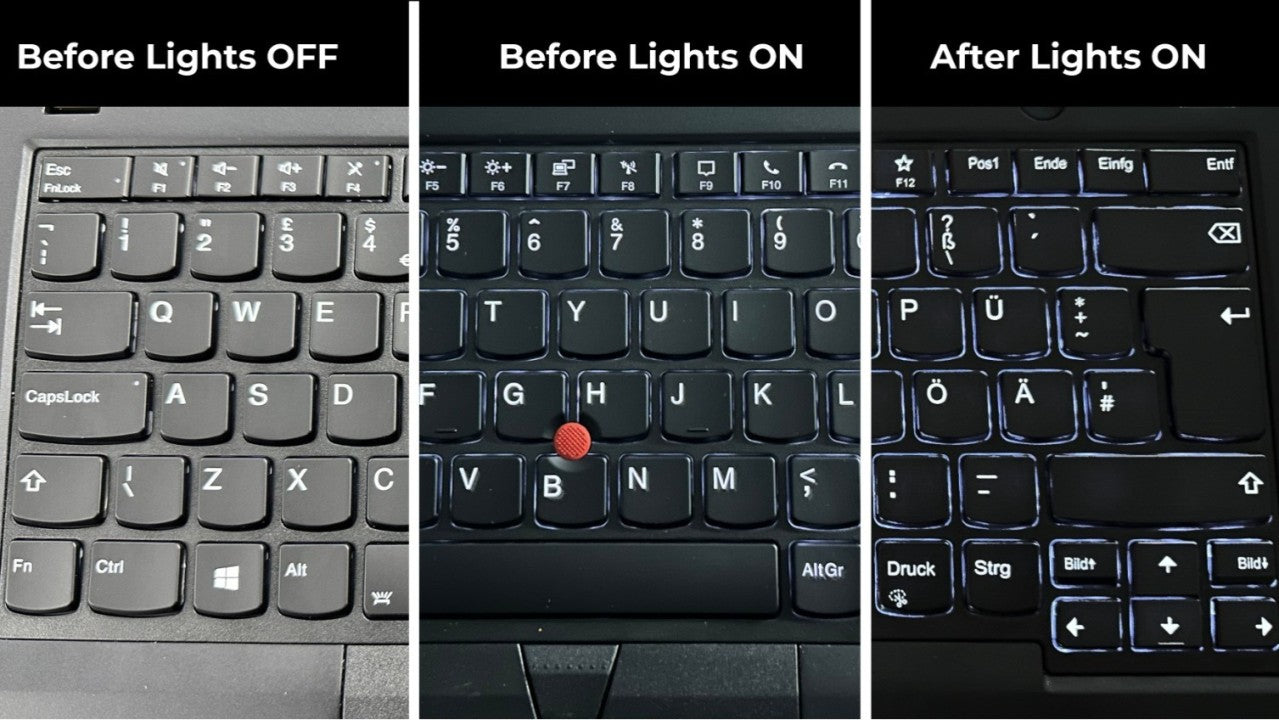
7. Ghost Effect
The ghost effect occurs when the keyboard print or stickers do not block out the backlight on the old keyboard sufficiently. This results in the old lettering being visible when the backlight is turned on in a dark room. Proper layering techniques can prevent this issue. Since 2015, our keyboard print and SticKeys have successfully eliminated the ghosting effect1.
By understanding these key terminologies and techniques, you can appreciate the intricacies involved in keyboard refurbishment. Whether you're refurbishing keyboards yourself or simply interested in the process, this knowledge will help you make informed decisions and appreciate the craftsmanship involved.